ON
ONE OF MY LAST FASHION POST I had a blurred background picture and one of
the readers asked me how I blur the background like this. I wanted to share
this tip with you guys as it sometimes can be a lifesaver to us fashion
blogger. Sometimes I don’t want the background details to cover the outfit I am
wearing or capture the attention, to I just blur it and also it can work when
you have some other people in the picture that you don’t want to concentrate
on. This feature doesn’t need a special
camera or a special lens, all you need it just a good picture you like and a
photoshop and you are good to go.
First you need to choose the picture that you want to blur
the background on (CTRL+O). Next you have to choose the quick selection tool
from the left tool bar. It looks like the one selected in the picture.
Second this you got to do is to choose the parts where you want to concentrate or select it. One of the best things about this tool is that photoshop is smart enough to understand what parts you want to choose and will select a big portion of it. If there are some parts that photoshop selected and you don’t like, just choose the – sign and start pressing on it and it will just go away. If you want to control the size of the tool, you would find it as the circle with the number under it on the upper tool bar. It is a picture of you, I advise you to be careful on selecting and deselecting because it would be really apparent after you blur.
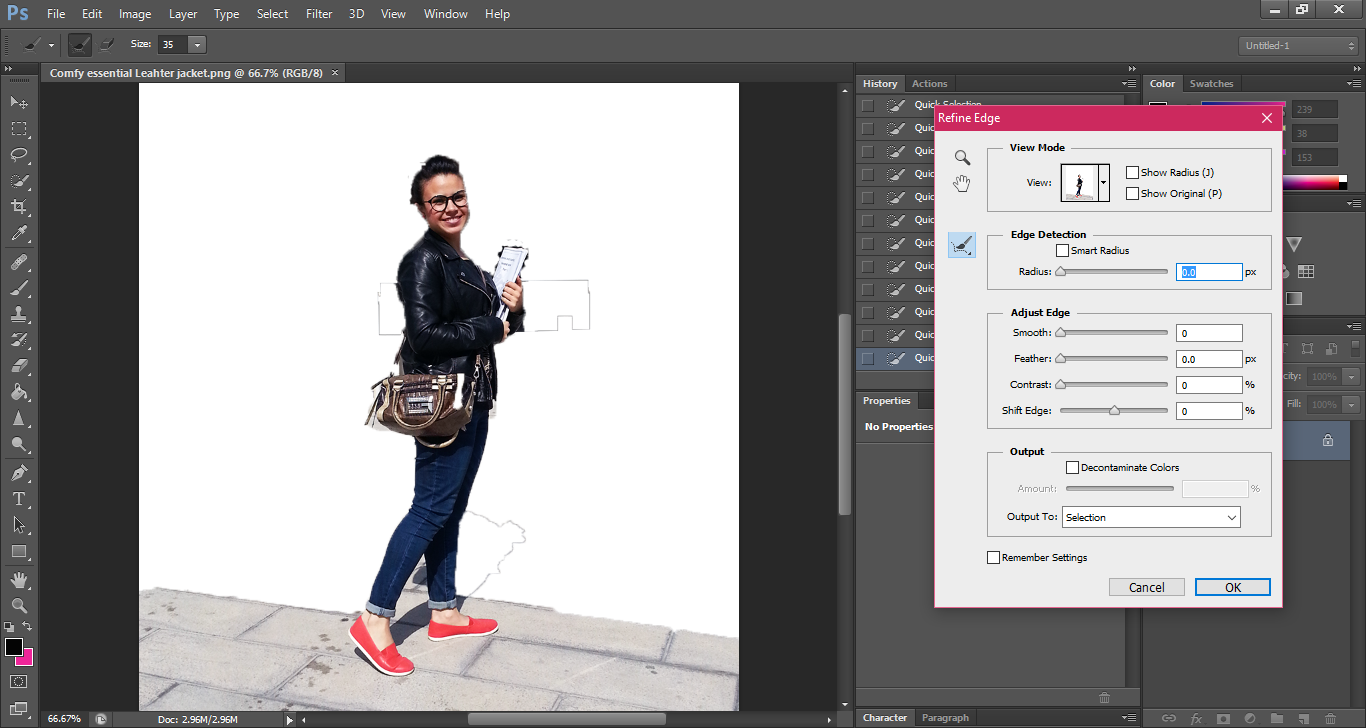
Third you need to press refine edges as shown in the
picture. On the smooth option, change it as desired. Usually I just make it
till fifty not more or less. Press ok when you finish.
Fourth, right click on the image and choose select inverse.
This would select everything in the picture instead of you and the blur would
take notice of only the background.
Fifth on the menu bar, choose filter, blur and then lens
blur as shown in the picture. Make sure you select lens blur to get the same
result of blur as the camera lens would have taken.
Sixth, on the radius option control it as desired. Usually I
would blur it from 10 to 20 according the amount of blur I want in the
background.
Viola, you got your blurred image.
TIPS:
If you already edited
the picture before selecting the part, you need to get back on the background
layer before applying the blur filter or otherwise it won’t work.
If you selected before adjusting you image, all you need is
to get back on the background layer in order for the adjusting to work on all
the image, not just the selected part.
I hope you got the desired information from this tutorial
and please leave in a comment if you would desire any other photoshop or
blogging tips tutorial, so I can do it and post it for you.


I had no idea you could do this so easily, definitely handy if the lens doesn't quite do it well enough. you've done it so well!
ReplyDeleteARABELLA.CO.UK
Yes it can be used in that too.
DeleteI know this already. But, very helpful to unknown persons. Thanks for sharing! :)
ReplyDeleteXoxo,
Love from www.trangscorner.com {a lifestyle, fashion, beauty, and food blog}
When I started blogging I had no idea that I could do that with photoshop and knowing this helped me quite a lot in my blog. I wanted to provide people with the same benefits I had known.
DeleteAwesome info, thanks!!
ReplyDelete♥
Amber
All the Cute
I am glad that you liked it.
DeleteThis was great! I've always wanted to know how to do that! Thanks.
ReplyDeletexx. The Coastal Confidence
http://the-coastalconfidence.com/
You are so welcome.
DeleteLove this tutorial! Super helpful, especially with the step by step pictures. Thank you!
ReplyDeleteXO kylie
www.Leavingkyliefornia.com
I am glad that I could help somehow.
Delete